Adding a Connection
When logged into your ILG Forms web portal, navigate to Connected Data > Connections > Add Connection - Microsoft Graph.
Once added, you'll be presented with the Connection's properties to fill out, and then hit SAVE to view the Authorize button.
This will authorise the use of the currently signed-in Microsoft account. If you prefer to use a different account, you can either log out of all currently signed-in accounts and then click this button again or you can open an incognito, private browsing window to sign in with your preferred account.
| Property | Description | Obtained? |
| Client ID | Client ID Set up for your App. This value will be a GUID in the form:
3c8ae5a6-4869-41a9-af36-8517434d9cc0 | via Azure portal |
| Client Secret Value | Client Secret Value Set up for your App. This value is NOT a GUID and will be in the form of:
obH8P~yMaQYvxv-JZDKUIv.N9XVe3Kc_l8Z5OaYF | via Azure portal |
| Callback URL (Redirect URI on Azure portal) | https://www.ilgforms.com/oauth2/microsoftgraphcallback
| used in Azure portal, |
| Tenant ID | Use this only when an "Organization Only" application is registered. NOT a multi-tenant application.
How to find your tenant ID - Microsoft Entra | Microsoft Learn | via Azure portal
|
You MUST enter the Tenant ID if an 'Organization Only' application is registered. The tenant ID is a GUID value that looks like this: 20380a36-8777-43f7-a79e-65bdb53f462

The Tenant ID can be left blank if the app registration is set as a multi-tenant.
All the details necessary to configure your connector are available to you after you setup your app on the MS Azure portal. In the next section we provide detailed instructions as to how to do this, so buckle up and let's begin.
Please note that the process documented below is liable to change without notice as Microsoft updates their Azure portal interface.
App Registration on Microsoft's Portal
By the end of this process you will have registered a new app on the Microsoft Azure portal; created a client secret value and acquired all the necessary details necessary to authenticate your MS Graph connection in our platform.
New App Registration
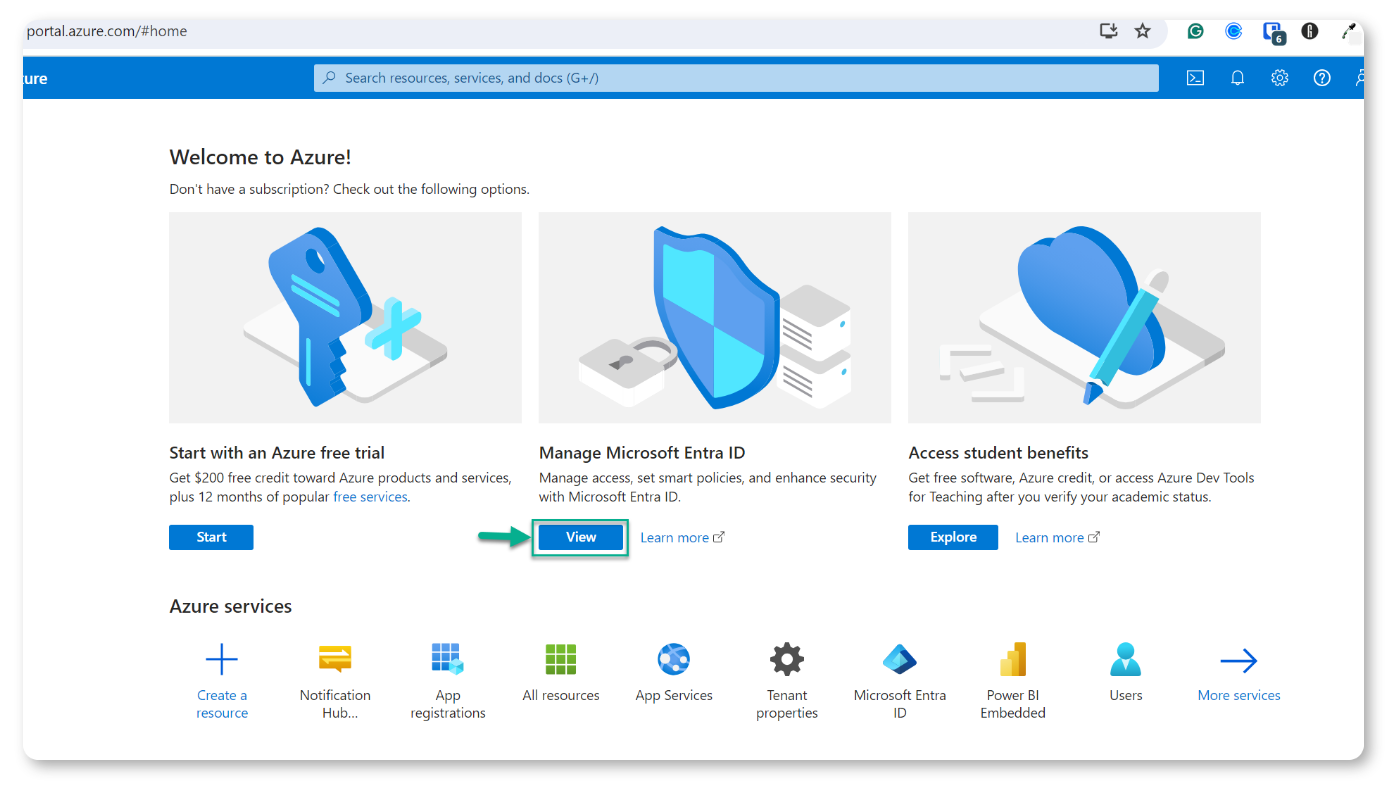
The first thing you need to do is go to https://portal.azure.com/ and login with your Microsoft/Office/Excel/Onedrive/Sharepoint/Azure/Entra account details.
Click the View button on the "Manage Microsoft Entra ID" option to proceed to the next step where you can start the App Registration process.
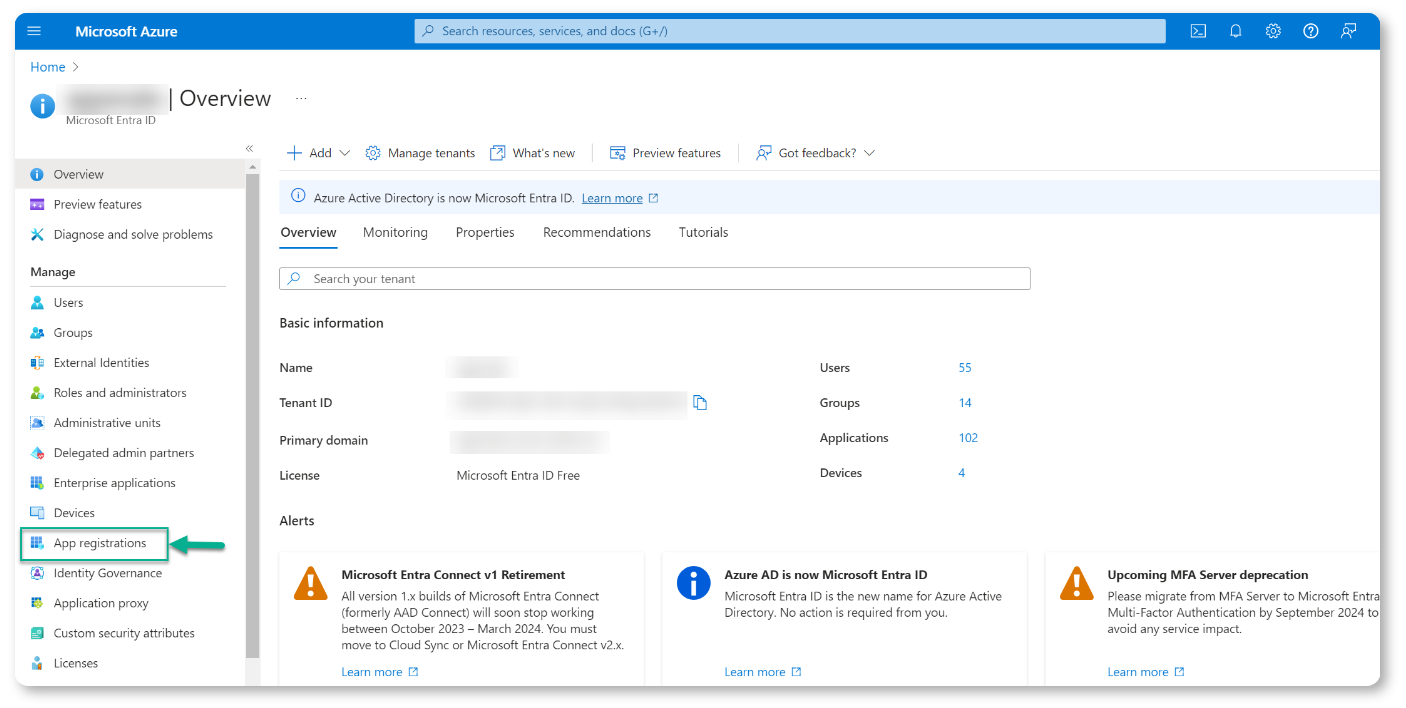
On this page, click the "App registrations" option in the main left menu to start the app registration process as shown in the screenshot below.
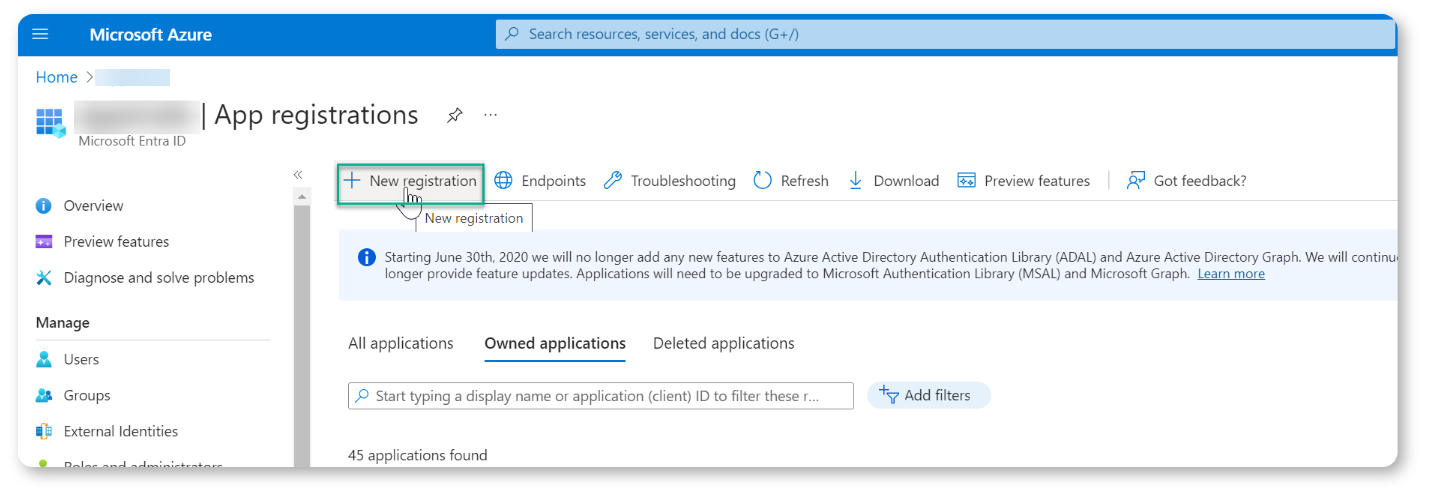
Once on the App registration page, click the "New Registration" button as shown in the screenshot below:
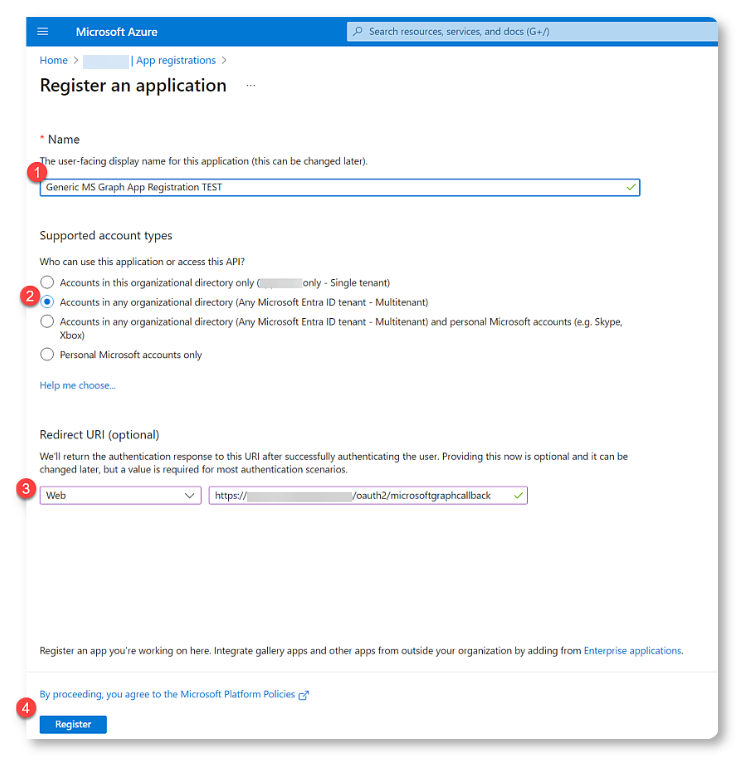
On the next screen you will need to do the actual registration of your application.
- Name - The display name for the application you are registering. You can change this at a later stage.
- Who can use this application or access this API? - (Selecting the 2nd option - "Accounts in any organizational directory (Any Microsoft Entra ID - Multitenant)" will work for most use cases)
- Redirect URI - Select the "Web" option, then copy the "Callback URL" as shown in the "Adding a Connection" section of this article and paste it into this field)
- Click "Register" - to register your application.
After clicking the "Register" button in the step above, your app will be created, and you will be able to begin setup of your secret keys.
Create Client Secret Value
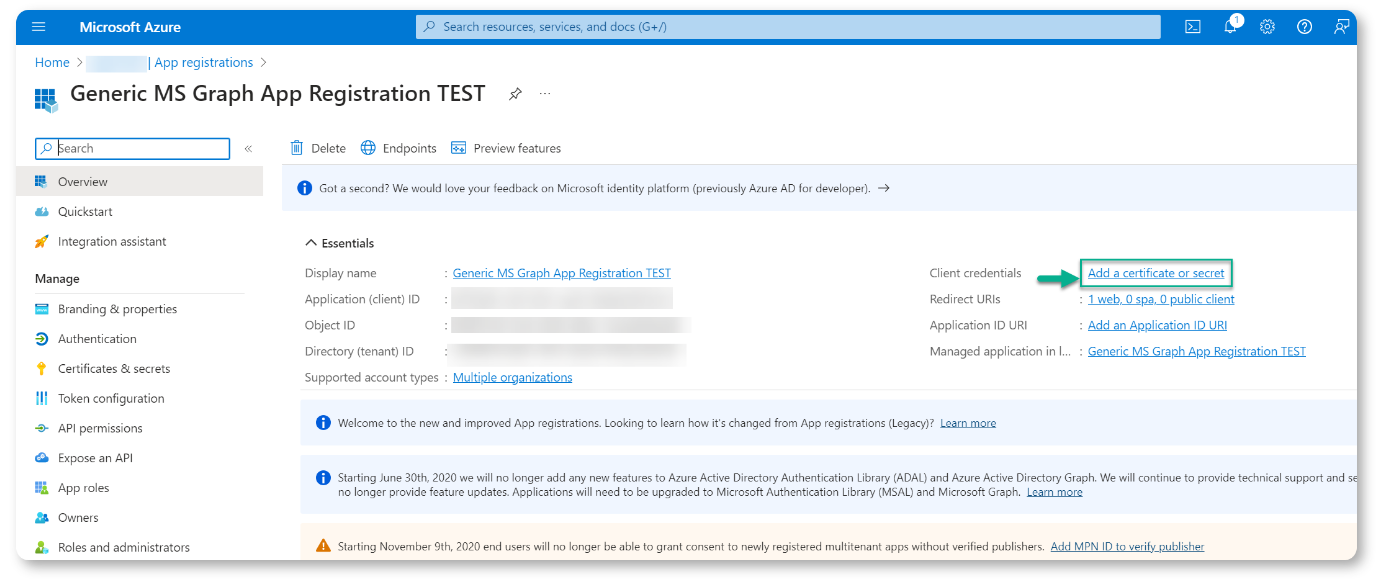
In the Overview of your newly created app's settings, click the link in the "Client Credentials" section called "Add a certificate or secret" as shown in the screenshot below:
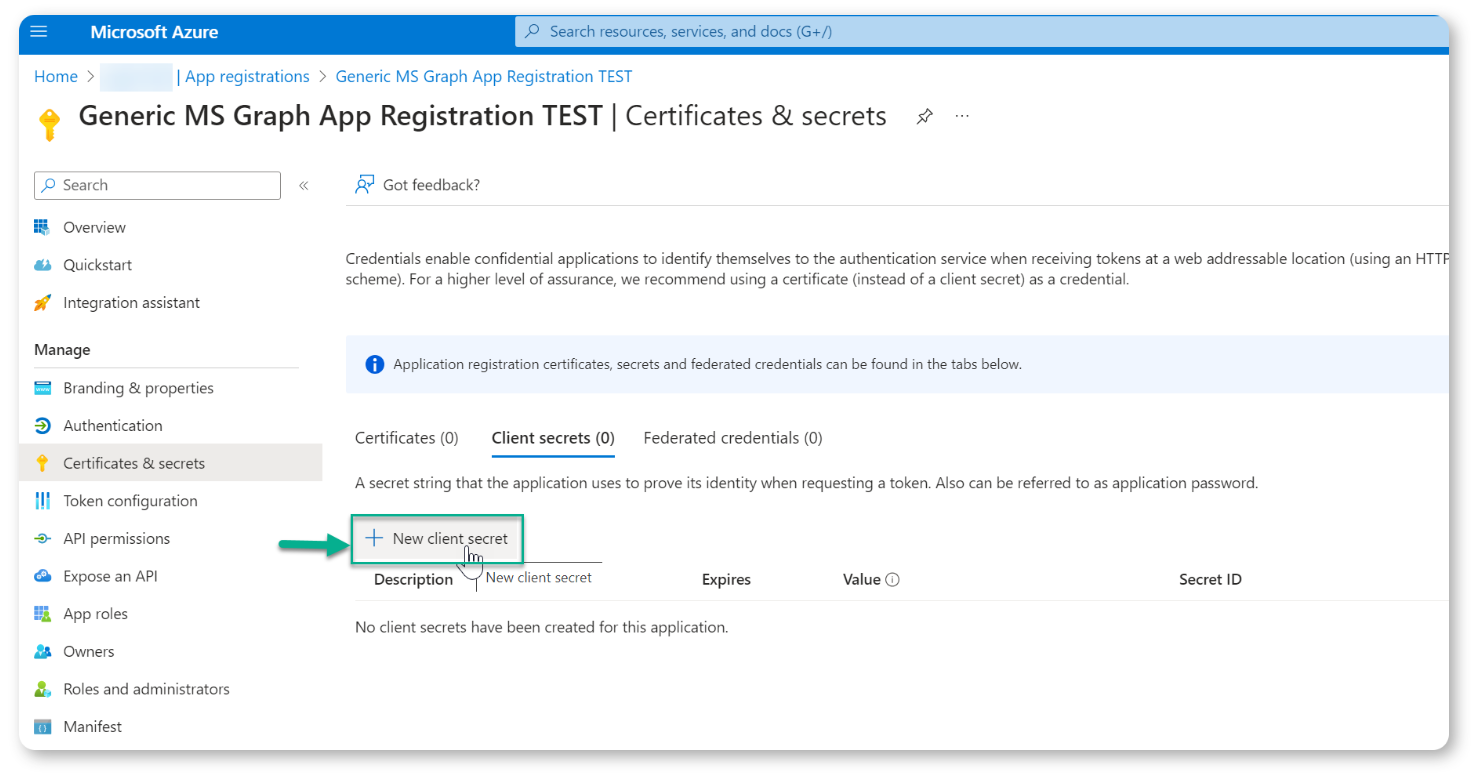
This will take you to the screen where you can manage your certificates and secrets. On this screen, click on the "New client secret" button as shown in the screenshot below:
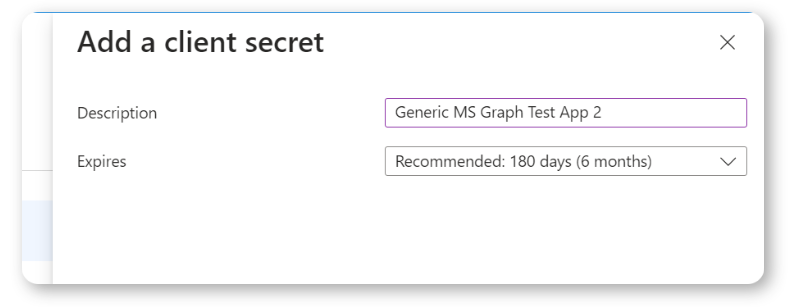
When you click on the "New client secret" button, a sidebar will open on the right of the screen, as shown in the screenshot below. Here, you will need to enter a descriptive name for this secret key as well as specify how long you want the key to be valid for. We used 180 days as a default, but you can make it longer or shorter as your organisation's security rules dictate.
Click the "
Add" button at the bottom of the "
Add a client secret" sidebar to save your changes.
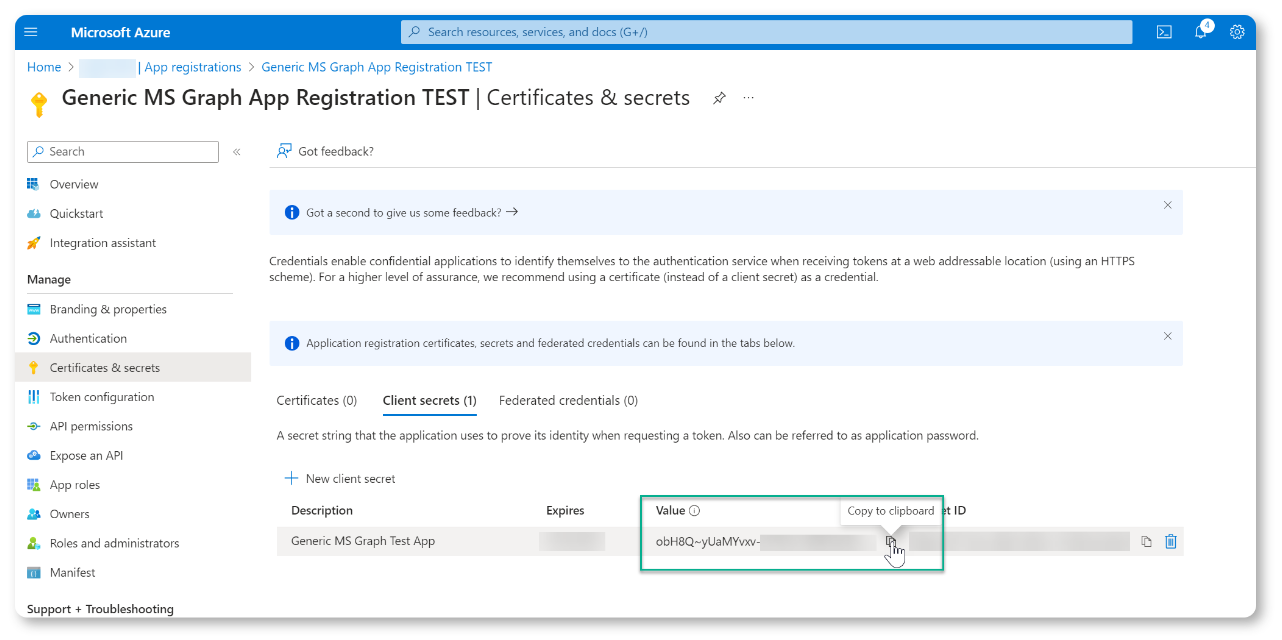
Once your changes are saved, you will be taken to the Client Secrets overview pages where you can copy the Secret Value as shown in the screenshot below:
Paste this Client Secret Value in the "Client Secret" field on the "Adding a Connection" part of our secure portal.
You are now ready to configure your API Permissions for the Microsoft service that you wish to connect to.
Configuring API Permissions
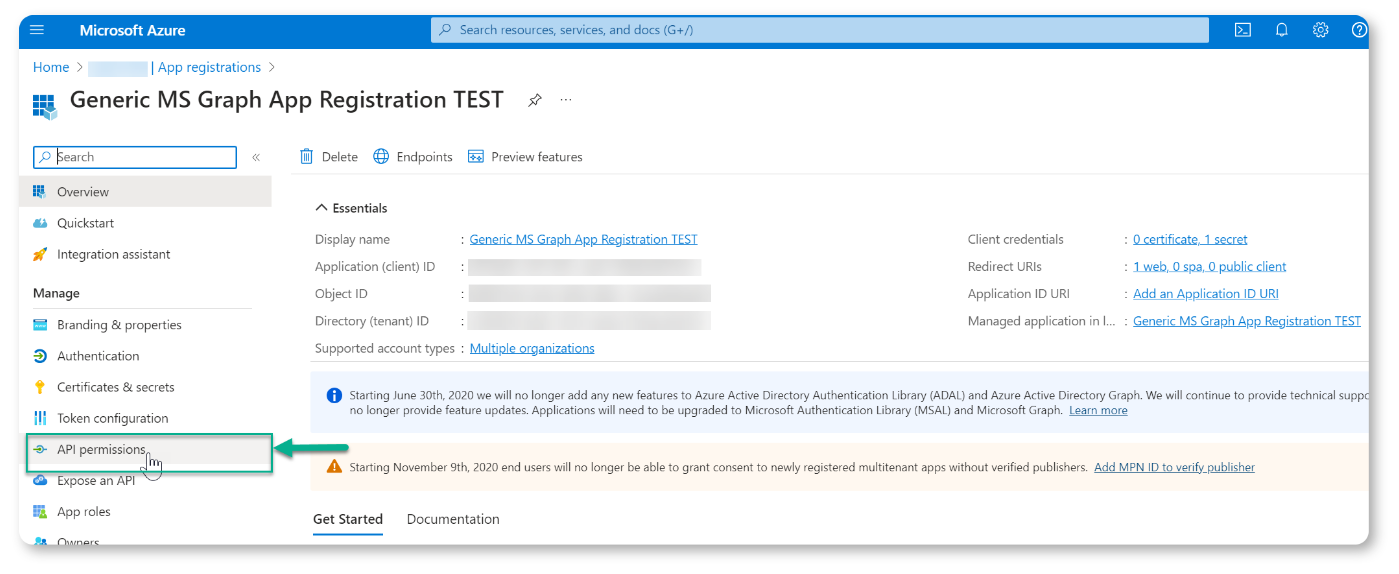
Each Microsoft Service that you wish to connect to through this app registration process, requires you to configure specific API permissions for it so that it can perform correctly on our platform. On the app registration overview page, click the "API Permisssions" option in the left menu to get started.
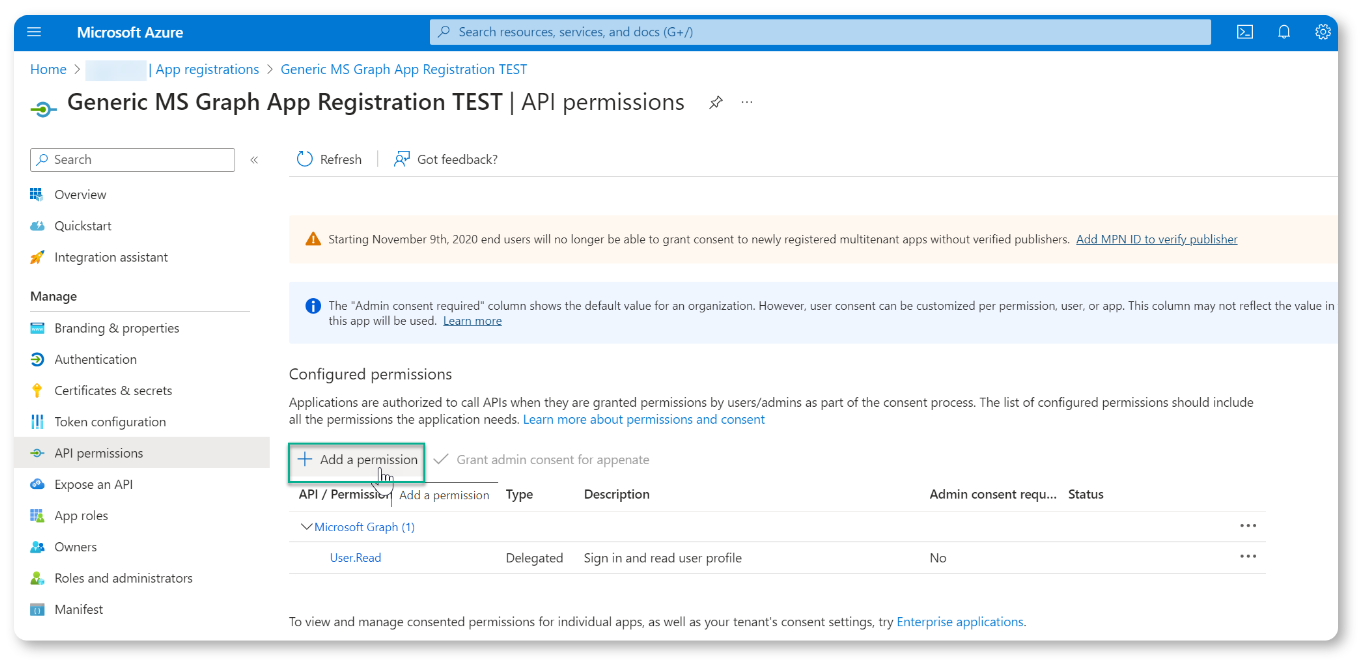
On the next page click the option to "Add a permission" to select the Microsoft Service that you wish to add permissions for.
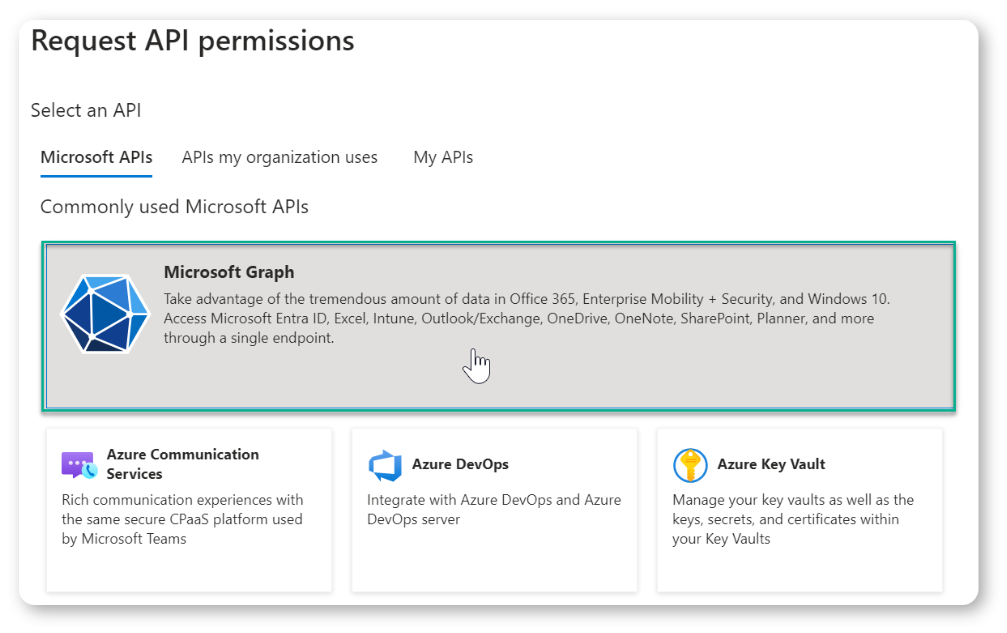
When you click on the "Add a permission" button as shown above, a section will open on the right side of the screen, allowing you to choose which Microsoft service you wish to add permissions for. This is where it is vitally important for you to select the correct permissions for the respective Microsoft service you wish to use, in this case we select "Microsoft Graph" as shown in the screenshot below. The rest of this article provides instructions for setting up OneDrive and Sharepoint to work with your MS Graph connection.
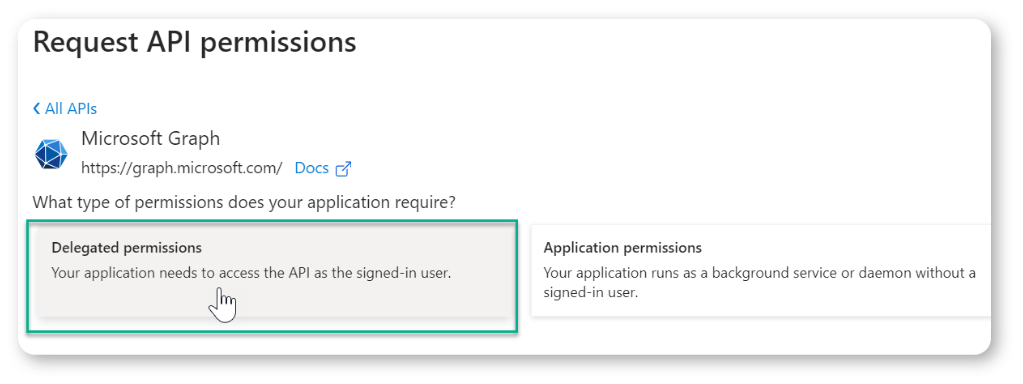
After selecting "Microsoft Graph" as the service for which you would like to configure API permissions, on the next screen, select "Delegated Permissions" as shown in the screenshot below.
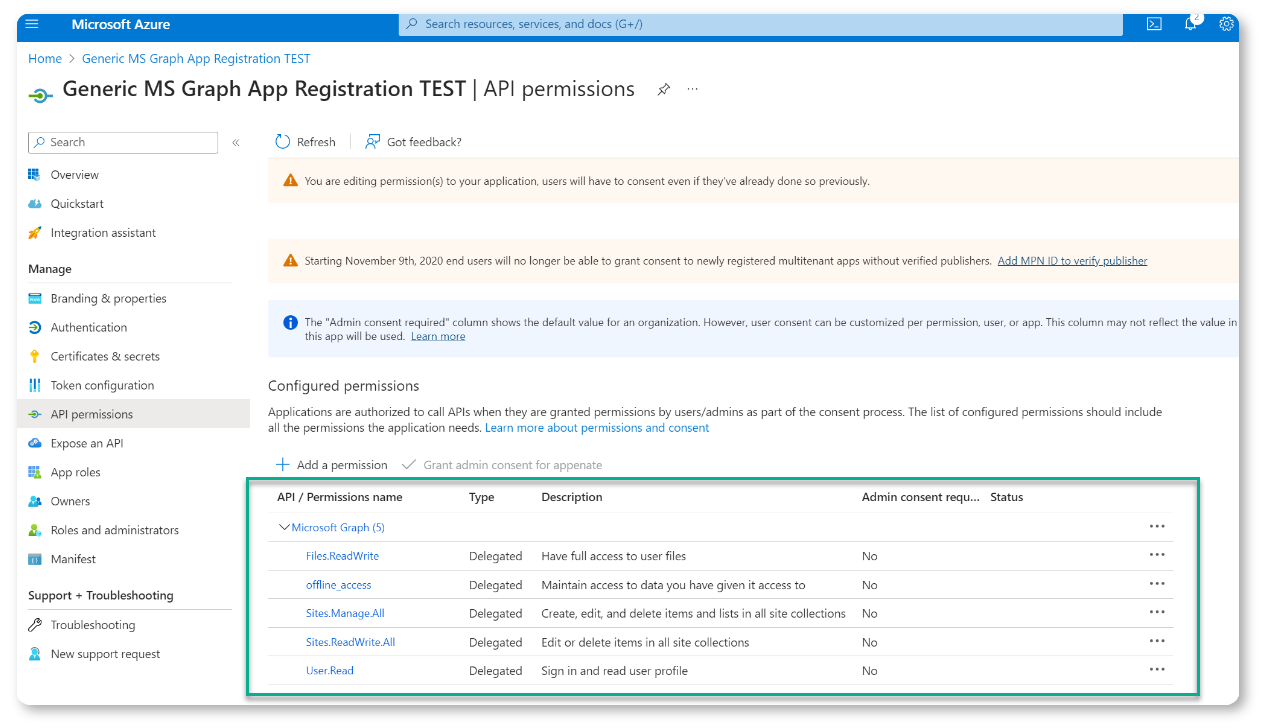
On the "Delegated Permissions" screen, you will need to add explicit support for the following API permissions for Sharepoint or OneDrive to work on your MS Graph connection.
Sharepoint or OneDrive API Permission Requirements
|
API/Permission Name
| Type | Description
|
offline_access
| Delegated | Maintain access to data you have given it access to.
|
Sites.Manage.All
| Delegated
| Create, edit, and delete items and lists in all site collections.
|
Files.ReadWrite
| Delegated
| Read, create, update, and delete the signed-in user's files.
|
Sites.ReadWrite.All
| Delegated
| Edit or delete items in all site collections.
|
User.Read
| Delegated
| Sign in and read the user profile.
|
Your permissions are setup correctly if they look like the permissions in the screenshot below:
If you've completed all of the above successfully, then you are finally ready to authorise your connection on our platform.
Authorising Connection
On our secure web portal, after entering your Client ID and Secret, hit Save and then Authorise. If you've done everything correctly, then after you authorise our platform to connect to your account, you should see the success indicator below:
MS Graph Connections support 2FA when authorising.
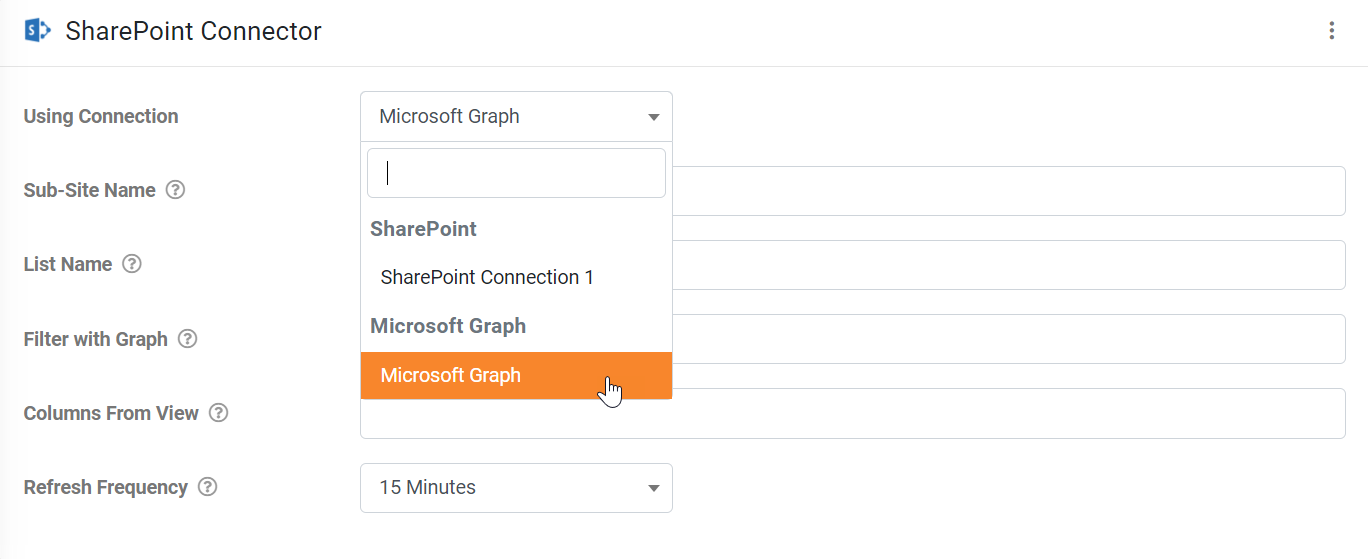
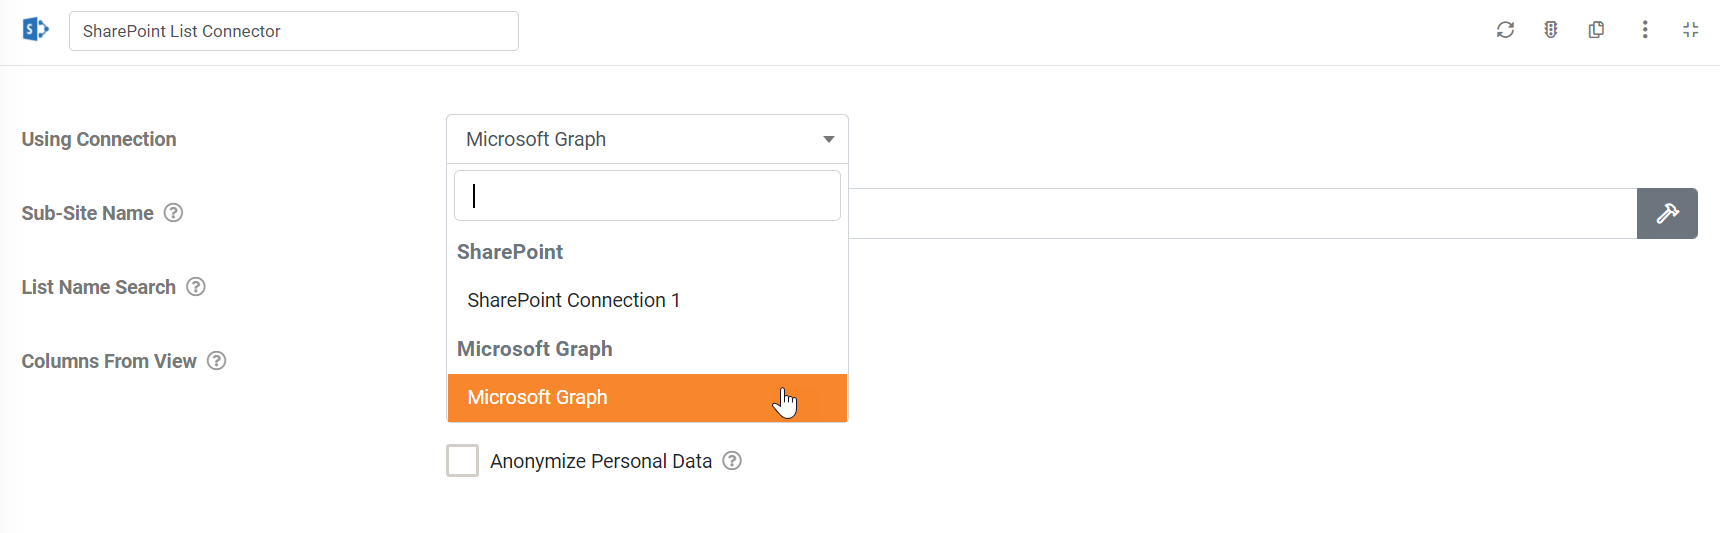
When adding a Form or Data Source Connector, you can select the MS Graph Connection in the Using Connection property dropdown.
Data Source Connector
When adding a Sharepoint List Data Source Connector or any other supported MS product connector, select the MS Graph Connection instead of a Sharepoint Connection in the Using Connection dropdown.
| Property | Description |
Sub-Site Name
(required) | This field is required, and only the Site Name OR Subsite Name will need to be entered. |
List Name
(required) | Enter the name of the SharePoint data List that you want to bind to.
The List must be accessible by your connected SharePoint user account. |
Filter with Graph
(optional) | Optionally define a filter statement to filter your SharePoint List results.
Please note: The field(s) being filtered will need to be indexed on the SharePoint List.
Learn more about Filtering with Microsoft Graph |
Columns From View
(optional) | You can specify the internal column names in a comma-separated list. e.g. ID,Column 1,Column 2,...
Learn more about internal column names |
Refresh Frequency
(required) | The time interval of which data is pulled and refreshed by this connector.
|
When adding a Sharepoint Connector or any other supported MS product connector, select the MS Graph Connection instead of a Sharepoint Connection in the Using Connection dropdown.
| Property | Description |
Sub-Site Name
(required) | This field is required, and only the Site Name OR Subsite Name will need to be entered. |
List Name Search
(required) | Search for the name of the SharePoint data List that you want to bind to. The List must be accessible by your connected SharePoint user account.
Note: Only the first 100 lists will be searched, and only 25 will be displayed in the dropdown.
If your list is not found using the Search option, please hit 'Specify List' to manually type it in. |
Columns From View
(optional) | You can specify the internal column names in a comma-separated list. e.g. ID,Column 1,Column 2,...
Learn more about internal column names |